I did it! I migrated my blog from my dusty old WordPress site to a shiny new Pelican generated site hosted on Amazon S3. In this post I'll discuss my choices and help get you started if you're looking to make a similar move.
What is Pelican?
Pelican is a static site generator that is written in Python and uses Jinja2 templates. Before discovering and deciding on Pelican, I had been contemplating options for writing blog content in Markdown and use Git for better version control. I was also looking for something more portable than WordPress that I could potentially containerize and easily scale in a public cloud instead of traditional VPS hosting.
Ultimately, I found that using a static site generator like Pelican was going to be the absolute best option for hosting my blog. Here's why:
- No database to manage and secure
- No authentication to manage
- Static pages load faster
- Less resources needed to serve static pages
- All pages can be cached by CDNs
- Completely stateless, can scale easily
- All content can be version controlled in Git
The idea behind static site generators is that most of the dynamic content on websites actually doesn't change much. For example, with a dynamic site a header.php file might be dynamically included on a page every time the page is requested even though the content is the same every time. It would make much more sense to just generate the entire page once and save it instead. When a client requests the page, it can just be served without any back-end processing.
The main disadvantage; however, is also that all the content is static. Content can't dynamically be retrieved from a database every time the page is loaded, for example. Instead, any dynamic content on the page can only be updated client-side using JavaScript in the browser. For that reason, adding comments, searches, or other inputs means needing to use an external (often third-party) service. It's very common to see static blog sites include search inputs tied to custom Google searches, and Disqus comment sections embedded on articles (like the one you'll find below this article). There are a few other disadvantages worth mentioning:
- No Content Management System (CMS) or admin interface
- No user/role authentication and authorization
- Must be open to using text files and command line
- Lack of a CMS and web-based editor makes it harder to draft posts on mobile devices
- Less commercially supported themes than the popular alternatives like WordPress
In the end, Pelican was a perfect fit for me because it uses Python and Jinja2 templates which I was already familiar with. Bootstrapping a Pelican site and dealing with dependencies is also much simpler when compared with other Static Site Generators like Jekyll.
Why Amazon S3?
For hosting the static site, I considered and test drove both GitHub Pages and Amazon S3.
GitHub Pages is potentially the cheaper and simpler option. It offers free hosting for public repos, free custom domain name options, free and automatic CDN caching, and free and automatic SSL certs. You simply point the page to the directory with your static HTML files and it works. If you use Jekyll, it will even build the site for you.
One of the main downsides for public repositories in my opinion; however, is that any drafts or mistakes that are committed will be immortalized publicly in the public repository. Anyone can see them by browsing through commits in GitHub or cloning the repository. That's probably fine for most project documentation, but it seems less ideal for personal blog sites where drafts are more likely to be fleeting or unfinished ideas that aren't ready to be published. The simple solution to this problem of course is paying $4/month for a GitHub Pro subscription which allows you to use GitHub pages on private repositories.
GitHub pages a great option, but I ultimately I decided against it in favor of Amazon S3 mainly for the added control and learning opportunities. It's perfectly feasible to host a static blog site on GitHub Pages, but I personally felt Amazon S3 was the better fit for the following reasons:
- Paying only for what you use (which I expect will still be less than GitHub Pro)
- More overall control and options to scale later if needed
- Knowing where my data is stored/replicated
- Gaining practical experience with AWS
Getting Started Guide
These instructions assume you already have an AWS S3 account, have read through and understand Amazon S3 pricing, and have Python installed on your local system.
Step 1. Activate a Python virtual environment
Open a terminal and use the commands in the output below to create a Python virtual environment in a new directory.
~$ mkdir ~/my-pelican-site
~$ cd ~/my-pelican-site
~/my-pelican-site$ python3 -m venv venv/
~/my-pelican-site$ source venv/bin/activate
(venv) ~/my-pelican-site$
NOTE: For Windows systems, use PowerShell and activate the virtual environment in using .\venv\Scripts\activate.ps1
Step 2. Install Pelican
With the virtual environment activated, use pip install pelican to install Pelican as shown below.
(venv) ~/my-pelican-site$ pip install pelican
Collecting pelican
...
...
...
Successfully installed MarkupSafe-1.1.1 blinker-1.4 docutils-0.16 feedgenerator-1.9.1 jinja2-2.11.2 pelican-4.5.0 pygments-2.6.1 python-dateutil-2.8.1 pytz-2020.1 six-1.15.0 unidecode-1.1.1
(venv) ~/my-pelican-site$
Step 3. Run pelican-quickstart
Next, issue the pelican-quickstart command to start an interactive prompt to setup the Pelican site.
(venv) ~/my-pelican-site$ pelican-quickstart
Welcome to pelican-quickstart v4.5.0.

This script will help you create a new Pelican-based website.

Please answer the following questions so this script can generate the files
needed by Pelican.


> Where do you want to create your new web site? [.]
> What will be the title of this web site? My Pelican Blog
> Who will be the author of this web site? Joe Shmoe
> What will be the default language of this web site? [en]
> Do you want to specify a URL prefix? e.g., https://example.com   (Y/n) n
> Do you want to enable article pagination? (Y/n) y
> How many articles per page do you want? [10]
> What is your time zone? [Europe/Paris] America/Los_Angeles
> Do you want to generate a tasks.py/Makefile to automate generation and publishing? (Y/n) y
> Do you want to upload your website using FTP? (y/N) n
> Do you want to upload your website using SSH? (y/N) n
> Do you want to upload your website using Dropbox? (y/N) n
> Do you want to upload your website using S3? (y/N) y
> What is the name of your S3 bucket? [my_s3_bucket] example.com
> Do you want to upload your website using Rackspace Cloud Files? (y/N) n
> Do you want to upload your website using GitHub Pages? (y/N) n
Done. Your new project is available at ~/my-pelican-site
(venv) ~/my-pelican-site$
NOTE: The name of the S3 bucket above should match your website's domain name. If you don't already have a domain name, consider using AWS route 53 to register a domain name first
Step 4. Create some initial content
Within the content/ directory, create some initial content by adding a markdown file titled "first-post.md" (or whatever you'd like). The contents of the file should look something like this
Title: My First Pelican Post!
Slug: my-first-pelican-post
Date: 09-01-2020
Author: Joe Shmoe

# This is my first H1 heading!

This is my first paragraph!

## This is my first H2 heading!

- This
- is
- my
- first
- unordered
- list!
Next, preview the site by running the development server with 'pelican -lr' or 'make devserver' if you're using a *nix system. Once the development server is running you can preview the site by navigating to http://127.0.0.1:8000 in your browser. Pelican will monitor your content for changes and automatically rebuild the site when changes are detected. All you need to do to preview the changes is refresh the page in your browser.
You can learn more about the metadata options that can be used in Pelican posts by reading the documentation.
If you are new to markdown formatting, also check out this cheat sheet.
Step 5. Install & Configure the AWS CLI
If you don't already have the AWS CLI utility installed, download and install it.
After installing the AWS CLI tool, you'll need to use the aws configure command to setup access to your AWS account.
(venv) ~/my-pelican-site$ aws configure
AWS Access Key ID [None]: ********************************
AWS Secret Access Key [None]: ********************************
Default region name [None]: us-west-1
Default output format [None]:
(venv) ~/my-pelican-site$
As you can see above, you'll be prompted to provide an IAM user access token which you can create by following the instructions here.
Step 6. Create a new S3 bucket for your site
Login to the AWS management console and navigate to S3 by searching for it in the services menu.
Next, create a new bucket in your preferred region. The name of the bucket will need to match the domain name visitors will use to reach your site (i.e. "example.com").
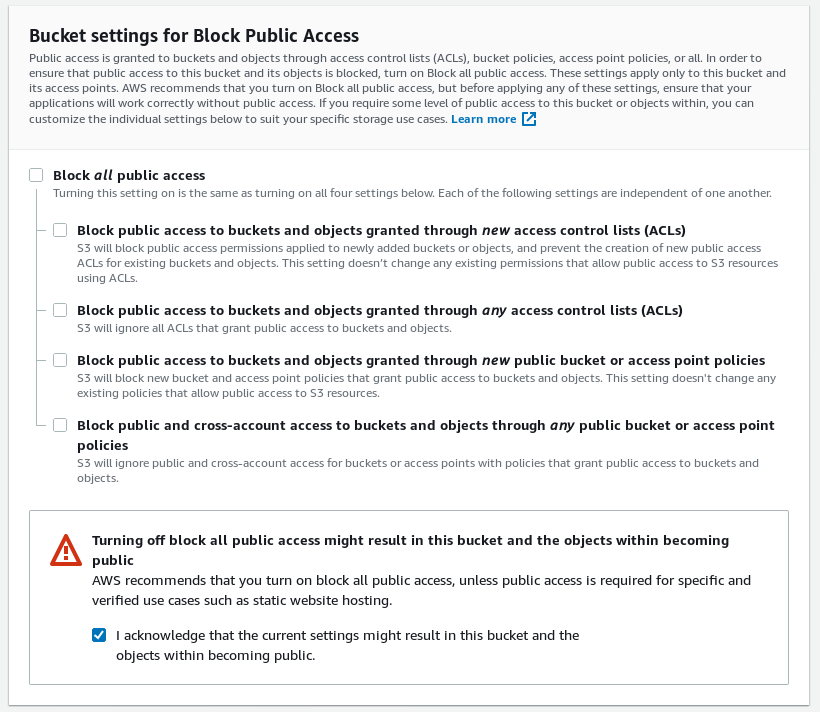
Since the S3 bucket will be used to host a public website, you'll need to uncheck "Block all external access" when creating the bucket.
After the bucket is created, click on the S3 bucket name in the S3 dashboard and navigate to Properties. Scroll down and enable Static website hosting accepting the defaults.
Next, navigate to the bucket Permissions by clicking once again click on the S3 bucket name in the S3 dashboard if needed. Edit the Bucket policy and the following JSON
{
    "Version": "2012-10-17",
    "Statement": [
        {
            "Sid": "PublicReadGetObject",
            "Effect": "Allow",
            "Principal": "*",
            "Action": [
                "s3:GetObject"
            ],
            "Resource": [
                "arn:aws:s3:::example.com/*"
            ]
        }
    ]
}
For more information on working with S3 buckets refer to the Developer Guide.
Step 7. Publish to Amazon S3
Now that the your bucket is setup and ready to serve your static site, it's time to add the site content to the bucket.
For *nix systems Pelican makes this simple by generating a Makefile using the questions answered in the pelican quickstart command. You can simply run make s3_upload to publish your site contents and sync the files to your S3 bucket using the aws s3 sync utility in the AWS CLI package installed earlier.
You can also edit the Makefile and modify the commands issued. Personally, I prefer to exclude syncing the drafts directory using the --exclude option of the aws s3 sync utility.
In Windows, you might need to manually perform these steps or create your own batch or powershell script. An simple, untested example of a batch script might look like this.
@echo off
set OUTPUTDIR=output
set DRAFTSDIR=drafts
set PUBLISHCONF=publishconf.py
set S3_BUCKET=example.com

pelican -o %OUTPUTDIR% -s %PUBLISHCONF%
aws s3 sync %OUTPUTDIR%\ s3://%S3_BUCKET% --exclude %DRAFTSDIR%\* --delete
After uploading the site content, your site should now be accessible via your bucket's S3 website endpoint. As stated in the S3 developer guide, depending on your Region, your Amazon S3 website endpoint follows one of these two formats.
- s3-website dash (-) Region ‐ http://bucket-name.s3-website-Region.amazonaws.com
- s3-website dot (.) Region ‐ http://bucket-name.s3-website.Region.amazonaws.com
Step 8. Configure a custom domain name
In order for your site to be accessible by your custom domain name, you'll need to add a CNAME record in the DNS Zone for your domain which points to the S3 bucket domain.
The process for this will vary depending on your domain registrar, but it should be fairly straightforward.
If you are using AWS Route 53 for DNS, review this example from the S3 developer guide
If you use a separate domain registrar/hosting provider, refer to their support pages on adding DNS entries. Here's an example of what that might look like.
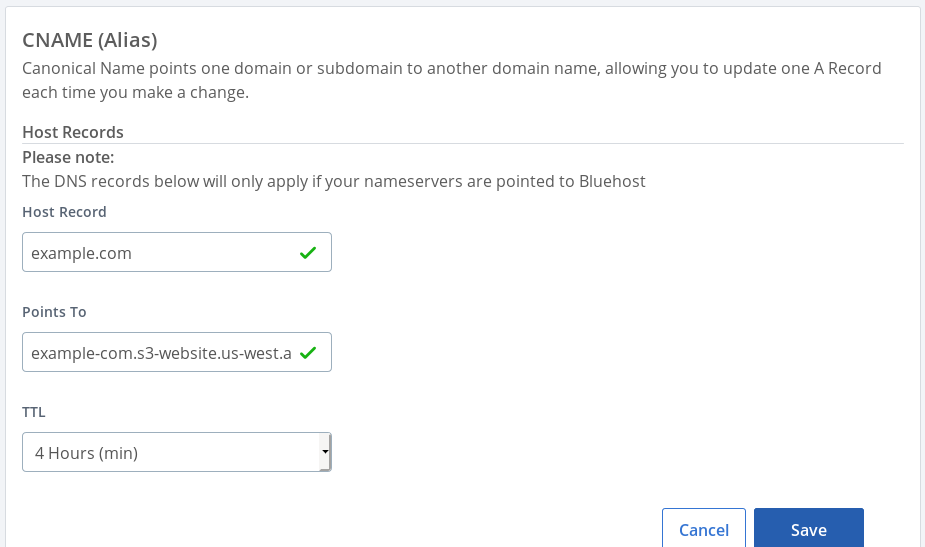
As you can see above, the CNAME record for example.com points to the S3 bucket domain name created earlier.
That's it!. After a short while, you should be able to reach your site by your custom domain name.
Next Steps
At this point, you should have a working static site hosted from an Amazon S3 bucket.
Next, I'd recommend reading through the Pelican docs, trying out some of the available pelican themes, and using Git to version control all of your content.
I'd also recommend using AWS CloudFront to serve your content more quickly and add HTTPS to your site. Doing so will also give you the option to make your S3 bucket contents private and only accessible through CloudFront.
Conclusion
In summary, Pelican allows you to write all of your content in markdown or restructuredText and use Git for version control, just like code. Because Pelican is a static site generator, there's no database or back-end to secure and no unnecessary processing overhead. All of the pages can be cached by CDNs and served very quickly at scale. This makes it simple and inexpensive to host in services like GitHub Pages, or in public clouds like AWS without the need to manage a server.
Although I'm only just getting started with Pelican myself, I've already found it to be a powerful static site generator that's perfect for tech bloggers. I'm excited to start leveraging it to contribute to my blog in a more serious way. As I continue to use Pelican throughout this blog, you may see more Pelican content, and possibly even a theme. Stay tuned!
Comments
comments powered by Disqus