Exploring Kubernetes Service Networking
Service objects in Kubernetes are API objects used to expose pods to other pods, and the outside world. As the name suggests, Service objects allow you to treat a set of pods as a service so that they can accessed by a common name or port without knowing anything about the individual pods currently running.
In this post, I'll be exploring the Service objects in Kubernetes using my own bare-metal Raspberry Pi K3s cluster, and peeking under the hood at the fairly low-level Linux networking magic that makes it all possible. We'll see how each service type we define builds on the last, with ClusterIPs as the foundation.
ClusterIP Services
A ClusterIP Service is the default object Service type. It creates a proxy for internal communication between pods. If you think about a ClusterIP Service like a loadbalancer/proxy appliance, it's a bit simpler to understand. Say for example we have front-end Pods that need to talk to our back-end Pods, our front-end Pods send requests to the load-balancer's virtual IP address and the load-balancer then proxies the requests to one of the back-end pods in the pool. You might ask why we couldn't just configure our front-end Pods to talk to our back-end Pods directly by IP address. Well first, we could have multiple back-end Pods at any given time. Second, remember that Pods are ephemeral and their IP addresses aren't predictable. If our back-end pod dies and a new replica is created, it would likely have a different IP address. If our Pods were traditional servers instead of Pods in this scenario, we'd use a load-balancer and point all of the front-end servers to a single virtual IP address on the load-balancer. The load-balancer would then proxy the connections to the various back-end servers in the pool. This is exactly what a ClusterIP is; It's a virtual IP address (and DNS record) used inside the Cluster to access resources on other Pods.
To see how a ClusterIP service works in action, I created a simple NextCloud Deployment with two Pods and a matching ClusterIP Service.
# nextcloud-dev.yaml
---
apiVersion: apps/v1
kind: Deployment
metadata:
  name: nextcloud-dev
  labels:
    app: nextcloud
    environment: dev
spec:
  replicas: 2
  selector:
    matchLabels:
      app: nextcloud
      environment: dev
  template:
    metadata:
      labels:
        app: nextcloud
        environment: dev
    spec:
      containers:
      - name: nextcloud
        image: nextcloud:latest
        ports:
        - containerPort: 80
# nextcloud-dev-clusterip
---
apiVersion: v1
kind: Service
metadata:
  name: nextcloud-dev-clusterip
  labels:
    app: nextcloud
    environment: dev
spec:
  selector:
      app: nextcloud
      environment: dev
  type: ClusterIP
  ports:
    - port: 8080
      targetPort: 80
Next, I applied the Deployment and Service and confirmed everything was up.
brian@ansible-vm:~/k3s$ kubectl apply -f nextcloud-dev.yaml
deployment.apps/nextcloud-dev created
brian@ansible-vm:~/k3s$ kubectl apply -f nextcloud-dev-clusterip.yaml
service/nextcloud-dev-clusterip created
brian@ansible-vm:~/k3s$ kubectl get pods,svc -o wide
NAME                                 READY   STATUS    RESTARTS   AGE   IP            NODE                NOMINATED NODE   READINESS GATES
pod/nextcloud-dev-64c9559b8c-qgjbp   1/1     Running   0          23s   10.42.1.170   k3s-worker-rpi002
pod/nextcloud-dev-64c9559b8c-pc296   1/1     Running   0          23s   10.42.0.85    k3s-master-rpi001

NAME                              TYPE        CLUSTER-IP    EXTERNAL-IP   PORT(S)    AGE     SELECTOR
service/kubernetes                ClusterIP   10.43.0.1             443/TCP    4d
service/nextcloud-dev-clusterip   ClusterIP   10.43.7.203           8080/TCP   9s   app=nextcloud,environment=dev
From the above output, we can see that the Pods are started on different nodes and the Cluster IP 10.43.7.203 on port 8080 was allocated for the Service. To test accessing the service from another Pod inside the cluster, I of course, needed another Pod. So, I started a Debian pod interactively to give me access to a shell and used the curl command to successfully download the NextCloud login page by using both the Cluster IP address, and the DNS name of the service.
brian@ansible-vm:~/k3s$ kubectl run debian-bash --rm -i --tty --image debian bash
If you don't see a command prompt, try pressing enter.
root@debian-bash:/# ip addr | grep 10.42
    inet 10.42.1.171/24 brd 10.42.1.255 scope global eth0
root@debian-bash:/# apt update
<...>
root@debian-bash:/# apt install curl
<...>
root@debian-bash:/# curl http://10.43.7.203:8080 > /dev/null
  % Total    % Received % Xferd  Average Speed   Time    Time     Time  Current
                                 Dload  Upload   Total   Spent    Left  Speed
100  6815  100  6815    0     0   141k      0 --:--:-- --:--:-- --:--:--  144k
root@debian-bash:/# curl http://nextcloud-dev-clusterip:8080 >> /dev/null
  % Total    % Received % Xferd  Average Speed   Time    Time     Time  Current
                                 Dload  Upload   Total   Spent    Left  Speed
100  6815  100  6815    0     0   144k      0 --:--:-- --:--:-- --:--:--  144k
Great! The login page was downloaded in both test cases. To recap what happened, I sent a request to the ClusterIP address on port 8080 and the request was proxied to one of the nextcloud-dev Pods on port 80. While this might all makes sense in theory, we know that there's no actual load-balancer appliance being used in our cluster so how is this all actually implemented? It's implemented using a process called kube-proxy and some good ol' fashioned iptables magic, of course... No, seriously.
The kube-proxy process runs on each node and acts as the loadbalancer/proxy for Kubernetes Services. If kube-proxy is run in userspace mode, an iptables rule is created to forward incoming connections for Services to the userspace kube-proxy process. The kube-proxy process then proxies the incoming connections to the appropriate destinations. If kube-proxy is run in kernelspace mode, iptables rules are created to directly proxy connections using netfilter within kernelspace.
Once again, I wanted to see this in action. Since kube-proxy is running in Kernelspace mode in my cluster I was able to see how the proxy works by listing the iptables NAT table. I did this on k3s-worker-rpi002 as shown below. I rearranged and removed some of the output to make it easier to read.
pi@k3s-worker-rpi002:~ $ sudo iptables --table nat -L -n
Chain PREROUTING (policy ACCEPT 43 packets, 6643 bytes)
 pkts bytes target     prot opt in     out     source               destination
 8229 1258K KUBE-SERVICES  all  --  *      *       0.0.0.0/0            0.0.0.0/0            /* kubernetes service portals */
<...>

Chain KUBE-SERVICES (2 references)
 pkts bytes target     prot opt in     out     source               destination
<...>
    0     0 KUBE-MARK-MASQ  tcp  --  *      *      !10.42.0.0/16         10.43.7.203          /* default/nextcloud-dev-clusterip: cluster IP */ tcp dpt:8080
    0     0 KUBE-SVC-WNPCWQYGSYD7A5N6  tcp  --  *      *       0.0.0.0/0            10.43.7.203          /* default/nextcloud-dev-clusterip: cluster IP */ tcp dpt:8080
<...>
Chain KUBE-MARK-MASQ (23 references)
 pkts bytes target     prot opt in     out     source               destination
    0     0 MARK       all  --  *      *       0.0.0.0/0            0.0.0.0/0            MARK or 0x4000
<...>
Chain KUBE-SVC-WNPCWQYGSYD7A5N6 (1 references)
 pkts bytes target     prot opt in     out     source               destination
    0     0 KUBE-SEP-REGCNUNS5RWEMTHB  all  --  *      *       0.0.0.0/0            0.0.0.0/0            /* default/nextcloud-dev-clusterip: */ statistic mode random probability 0.50000000000
    0     0 KUBE-SEP-AB7UW27KCQCMC3UG  all  --  *      *       0.0.0.0/0            0.0.0.0/0            /* default/nextcloud-dev-clusterip: */
<...>
Chain KUBE-SEP-REGCNUNS5RWEMTHB (1 references)
 pkts bytes target     prot opt in     out     source               destination
    0     0 KUBE-MARK-MASQ  all  --  *      *       10.42.0.85           0.0.0.0/0            /* default/nextcloud-dev-clusterip: */
    0     0 DNAT       tcp  --  *      *       0.0.0.0/0            0.0.0.0/0            /* default/nextcloud-dev-clusterip: */ tcp to:10.42.0.85:80
<...>
Chain KUBE-SEP-AB7UW27KCQCMC3UG (1 references)
 pkts bytes target     prot opt in     out     source               destination
    0     0 KUBE-MARK-MASQ  all  --  *      *       10.42.1.170          0.0.0.0/0            /* default/nextcloud-dev-clusterip: */
    0     0 DNAT       tcp  --  *      *       0.0.0.0/0            0.0.0.0/0            /* default/nextcloud-dev-clusterip: */ tcp to:10.42.1.170:80
To simplify this even more, I walked through the effective steps the request above would have taken.
| Step | Chain | Effective Matched Rule | Action |
|---|---|---|---|
| 1. | PREROUTING | Source: ANY Destination: ANY | Jump to KUBE-SERVICES |
| 2. | KUBE-SERVICES | Source: Any Pod IP Destination: The ClusterIP & Port | Jump to KUBE-SVC-WNPCWQYGSYD7A5N6 |
| 3. | KUBE-SVC-WNPCWQYGSYD7A5N6 | Source: ANY Destination: ANY | Jump to either: KUBE-SEP-REGCNUNS5RWEMTHB or KUBE-SEP-AB7UW27KCQCMC3UG (with 50% probability) |
| 4. | KUBE-SEP-REGCNUNS5RWEMTHB / KUBE-SEP-AB7UW27KCQCMC3UG | Source: Not the destination Pod Destination: ANY | DNAT to the destination Pod IP on TCP port 80 |
In summary, this example shows how connections sourced from within the cluster destined for the ClusterIP Service's address and port, ultimately get destination NATed to one of the Pods matched by our Service definition. This is implemented via the kube-proxy process on each node by using iptables and consequently netfilter (when run in kernelspace mode).
NodePort Services
While ClusterIP Services enable connections between Pods inside a cluster, NodePort Services enable connections from outside the cluster. They do this by mapping an externally reachable port on each node to a ClusterIP. Due to their simplicity, NodePorts are ideal for testing or development. However, they have a few limitations:
- The available port ranges exposed on each node must be between 30000–32767
- Only one Service can be used per exposed NodePort
- Directly accessing an application by using a node IP or DNS name, isn't as resilient as other options
To test out using a NodePort, I created this simple Service definition.
# nextcloud-dev-nodeport.yaml
---
apiVersion: v1
kind: Service
metadata:
  name: nextcloud-dev-nodeport
  labels:
    app: nextcloud
    environment: dev
spec:
  selector:
      app: nextcloud
      environment: dev
  type: NodePort
  ports:
    - port: 80
Next, I removed the ClusterIP Service I created earlier and applied the new NodePort Service.
brian@ansible-vm:~/k3s$ kubectl delete service nextcloud-dev-clusterip
service "nextcloud-dev-clusterip" deleted
brian@ansible-vm:~/k3s$ kubectl apply -f nextcloud-dev-nodeport.yaml
service/nextcloud-dev-nodeport created
brian@ansible-vm:~/k3s$ kubectl get pods,svc -o wide
NAME                                 READY   STATUS    RESTARTS   AGE    IP            NODE                NOMINATED NODE   READINESS GATES
pod/nextcloud-dev-64c9559b8c-qgjbp   1/1     Running   0          3d5h   10.42.1.170   k3s-worker-rpi002
pod/nextcloud-dev-64c9559b8c-pc296   1/1     Running   0          3d5h   10.42.0.85    k3s-master-rpi001
pod/debian-bash                      1/1     Running   0          10h    10.42.1.171   k3s-worker-rpi002

NAME                             TYPE        CLUSTER-IP    EXTERNAL-IP   PORT(S)        AGE   SELECTOR
service/kubernetes               ClusterIP   10.43.0.1     <none>        443/TCP        9d    <none>
service/nextcloud-dev-nodeport   NodePort    10.43.3.110   <none>        80:32540/TCP   54s   app=nextcloud,environment=dev
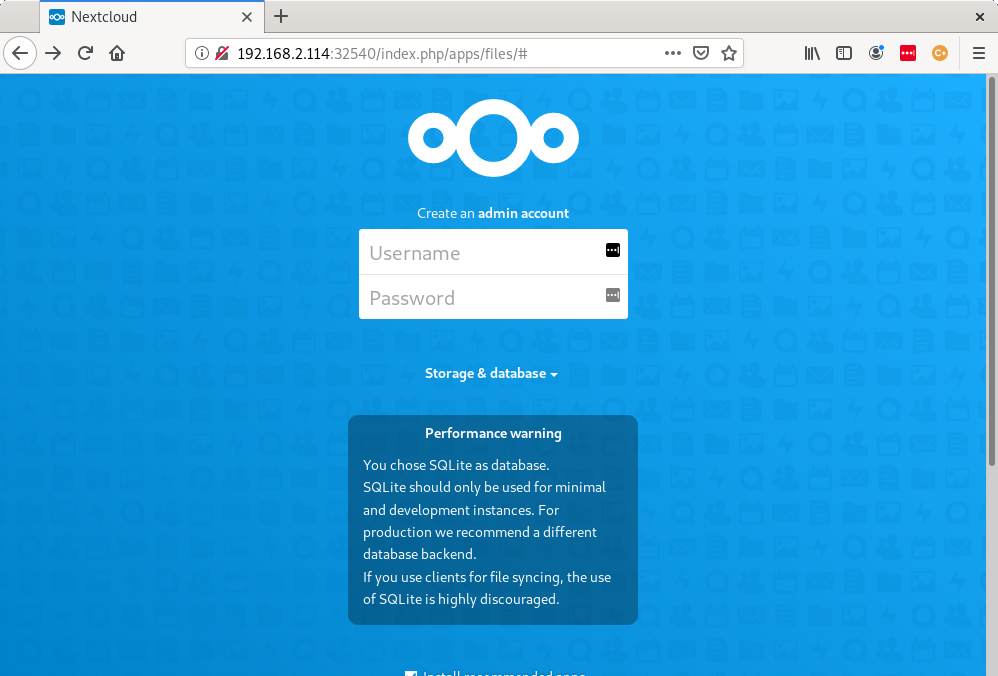
After applying the NodePort Service, we see above that the NodePort Service created a ClusterIP of 10.43.3.110 and the internal TCP port 80 is mapped to the external port 32540 which is exposed on each node. With this Service, I was able to access the NextCloud login page by using the IP address of any node in the Cluster over TCP port 32540.

So, a NodePort effectively just maps an external port on each node to an internal ClusterIP Service within the cluster. That's great, but requiring users to access an application by typing a high port number in their browser isn't a great user experience. Plus, if we direct users to only one of the nodes in this manner and that node fails or is rebooted, there would be an outage. To avoid these issues, we'd really need have a load-balancer appliance installed in front of the cluster to balance traffic across all the nodes. Well, Kuberenetes has that covered too.
LoadBalancer Services
A LoadBalancer Service in Kubernetes is exactly what I just described. It simply provisions an external load-balancer that balances traffic across all of the cluster nodes where a NodePort is created. In cloud environments, the external load balancer is provisioned by Kubernetes via the respective cloud-provider's APIs. In this way, LoadBalancer Services can be defined just like any other Service within Kubernetes, irrespective of which public cloud it's hosted in.
In bare-metal clusters like my Raspberry Pi cluster, however, there's no cloud provider that Kubernetes can interact with to provision a load-balancer for us. Instead, the best option is to use an external load-balancer called MetalLB that integrates with Kubernetes. The MetalLB website explains this further:
Kubernetes does not offer an implementation of network load-balancers (Services of type LoadBalancer) for bare metal clusters. The implementations of Network LB that Kubernetes does ship with are all glue code that calls out to various IaaS platforms (GCP, AWS, Azure…). If you’re not running on a supported IaaS platform (GCP, AWS, Azure…), LoadBalancers will remain in the “pending” state indefinitely when created.MetalLB is designed for bare-metal Kubernetes deployments and installs directly in the cluster. To install MetalLB, I followed the installation by manifest steps in the MetalLB documentation.
brian@ansible-vm:~/k3s$ kubectl apply -f https://raw.githubusercontent.com/metallb/metallb/v0.9.3/manifests/namespace.yaml
namespace/metallb-system created
brian@ansible-vm:~/k3s$ kubectl apply -f https://raw.githubusercontent.com/metallb/metallb/v0.9.3/manifests/metallb.yaml
podsecuritypolicy.policy/controller created
podsecuritypolicy.policy/speaker created
serviceaccount/controller created
serviceaccount/speaker created
clusterrole.rbac.authorization.k8s.io/metallb-system:controller created
clusterrole.rbac.authorization.k8s.io/metallb-system:speaker created
role.rbac.authorization.k8s.io/config-watcher created
role.rbac.authorization.k8s.io/pod-lister created
clusterrolebinding.rbac.authorization.k8s.io/metallb-system:controller created
clusterrolebinding.rbac.authorization.k8s.io/metallb-system:speaker created
rolebinding.rbac.authorization.k8s.io/config-watcher created
rolebinding.rbac.authorization.k8s.io/pod-lister created
daemonset.apps/speaker created
deployment.apps/controller created
brian@ansible-vm:~/k3s$ kubectl create secret generic -n metallb-system memberlist --from-literal=secretkey="$(openssl rand -base64 128)"
secret/memberlist created
To test out using a LoadBalancer Service, I first needed to disable the network service LoadBalancer that shipped with K3s. To do that, I edited the systemd unit file on the master node at /etc/systemd/system/k3s.service and added the --disable servicelb option to the ExecStart directive, then restarted K3s. After restarting, I confirmed that the servicelb was no longer running.
pi@k3s-master-rpi001:~ $ sudo nano /etc/systemd/system/k3s.service
pi@k3s-master-rpi001:~ $ sudo tail -3 /etc/systemd/system/k3s.service
ExecStart=/usr/local/bin/k3s \
    server \
    --disable servicelb
pi@k3s-master-rpi001:~ $ sudo systemctl daemon-reload
pi@k3s-master-rpi001:~ $ sudo systemctl restart k3s
pi@k3s-master-rpi001:~ $ exit
logout
Received SIGHUP or SIGTERM
Connection to k3s-master-rpi001 closed.
brian@ansible-vm:~/k3s$ kubectl get all -n kube-system
NAME                                         READY   STATUS      RESTARTS   AGE
pod/helm-install-traefik-dprrp               0/1     Completed   2          11d
pod/metrics-server-7566d596c8-5jhqw          1/1     Running     9          11d
pod/local-path-provisioner-6d59f47c7-w6tq5   1/1     Running     58         11d
pod/coredns-8655855d6-brz7h                  1/1     Running     9          11d
pod/traefik-758cd5fc85-m7kvw                 1/1     Running     10         11d

NAME                         TYPE           CLUSTER-IP      EXTERNAL-IP     PORT(S)                      AGE
service/kube-dns             ClusterIP      10.43.0.10                53/UDP,53/TCP,9153/TCP       11d
service/metrics-server       ClusterIP      10.43.143.113             443/TCP                      11d
service/traefik-prometheus   ClusterIP      10.43.243.252             9100/TCP                     11d
service/traefik              LoadBalancer   10.43.212.219   192.168.2.114   80:32452/TCP,443:32320/TCP   11d

NAME                                     READY   UP-TO-DATE   AVAILABLE   AGE
deployment.apps/metrics-server           1/1     1            1           11d
deployment.apps/coredns                  1/1     1            1           11d
deployment.apps/local-path-provisioner   1/1     1            1           11d
deployment.apps/traefik                  1/1     1            1           11d

NAME                                               DESIRED   CURRENT   READY   AGE
replicaset.apps/metrics-server-7566d596c8          1         1         1       11d
replicaset.apps/coredns-8655855d6                  1         1         1       11d
replicaset.apps/local-path-provisioner-6d59f47c7   1         1         1       11d
replicaset.apps/traefik-758cd5fc85                 1         1         1       11d

NAME                             COMPLETIONS   DURATION   AGE
job.batch/helm-install-traefik   1/1           73s        11d
Next, I once again created a new Service object below and then deleted the NodePort Service from earlier, before applying the new one.
brian@ansible-vm:~/k3s$ kubectl delete service nextcloud-dev-nodeport
service "nextcloud-dev-nodeport" deleted
brian@ansible-vm:~/k3s$ nano nextcloud-dev-loadbalancer.yaml
brian@ansible-vm:~/k3s$ cat nextcloud-dev-loadbalancer.yaml
# nextcloud-dev-loadbalancer.yaml
---
apiVersion: v1
kind: Service
metadata:
  name: nextcloud-dev-loadbalancer
  labels:
    app: nextcloud
    environment: dev
spec:
  selector:
      app: nextcloud
      environment: dev
  type: LoadBalancer
  ports:
    - port: 80
brian@ansible-vm:~/k3s$ kubectl apply -f nextcloud-dev-loadbalancer.yaml
service/nextcloud-dev-loadbalancer created
brian@ansible-vm:~/k3s$ kubectl get services -o wide
NAME                         TYPE           CLUSTER-IP     EXTERNAL-IP   PORT(S)        AGE     SELECTOR
kubernetes                   ClusterIP      10.43.0.1      <none>        443/TCP        11d     <none>
nextcloud-dev-loadbalancer   LoadBalancer   10.43.208.81   <pending>     80:31114/TCP   2m27s   app=nextcloud,environment=dev
The LoadBalancer Service started and we can see the Cluster-IP and ports above. However, the External IP is stuck in pending. That's because I didn't define a pool of IPs for MetalLB to use. This is done with a ConfigMap as explained in the MetalLB documentation.
brian@ansible-vm:~/k3s$ nano metallb-config.yaml
brian@ansible-vm:~/k3s$ cat metallb-config.yaml
# metallb-config.yaml
---
apiVersion: v1
kind: ConfigMap
metadata:
  namespace: metallb-system
  name: config
data:
  config: |
    address-pools:
    - name: default
      protocol: layer2
      addresses:
      - 192.168.2.200-192.168.2.225

brian@ansible-vm:~/k3s$ kubectl apply -f metallb-config.yaml
configmap/config created
brian@ansible-vm:~/k3s$ kubectl get svc -o wide
NAME                         TYPE           CLUSTER-IP     EXTERNAL-IP     PORT(S)        AGE   SELECTOR
kubernetes                   ClusterIP      10.43.0.1      <none>          443/TCP        11d
nextcloud-dev-loadbalancer   LoadBalancer   10.43.208.81   192.168.2.200   80:31114/TCP   12m   app=nextcloud,environment=dev
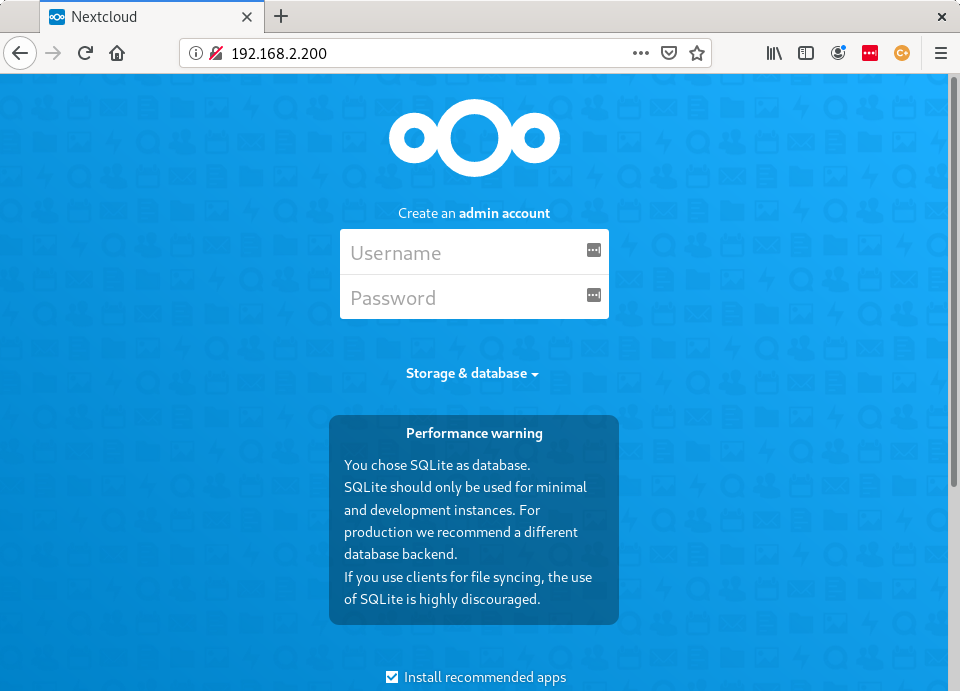
As shown above, after applying the ConfigMap, the external IP was now populated with the first IP in the defined range, 192.168.2.200. Using the external IP and port, I was now able to access the NextCloud login page without directly accessing a NodePort on a single node.

With MetalLB configured in layer 2 mode, the way this works is a bit interesting. It's explained very well in the MetalLB documentation which states:
In layer 2 mode, one node assumes the responsibility of advertising a service to the local network. From the network’s perspective, it simply looks like that machine has multiple IP addresses assigned to its network interface.What that effectively means is that in layer 2 mode, there's actually no network load-balancing occurring across the nodes. One node is elected the leader which responds to ARP requests for the IP addresses in the pool (implemented using VRRP). In this way, all the traffic is received on a single node, but if that node fails,a different node becomes the leader. So what we are getting in layer 2 mode is some much needed redundancy, and some additional DNAT to hide our NodePort's high port range. For a home cluster, this is a simple and effective solution that works well. In layer 3, or BGP mode, MetalLB uses relies on an external BGP router to do the load-balancing based on Equal Cost Multi-Pathing (ECMP). Since I'm using a MikroTik router to connect the nodes in my cluster, this may be something I explore more later. For now though, layer 2 mode supports my needs well.
Services Summary
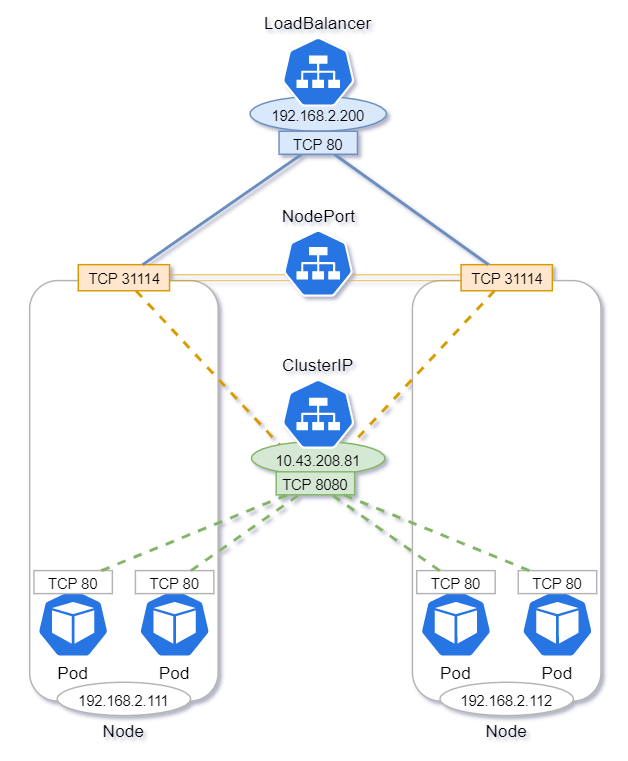
To recap, we've seen how each of the Service types we've talked about builds on the last. ClusterIPs are at the foundation and are used to proxy connections within the cluster. This is implemented with the kube-proxy process which runs on every node. NodePorts map internal ClusterIPs to external ports on each node. In this way, they expose pods to the outside world, but offer no redundancy and can only expose a range of high ports. LoadBalancers solve the problems of NodePorts, by distributing traffic across all the nodes where NodePorts are exposed. To visualize these concepts and make them more concrete, consider this diagram showing how a ClusterIP and NodePort are used when a LoadBalancer Service is created.
